DIY Wooden Monocular Telescope Kit: Build & Focus Guide

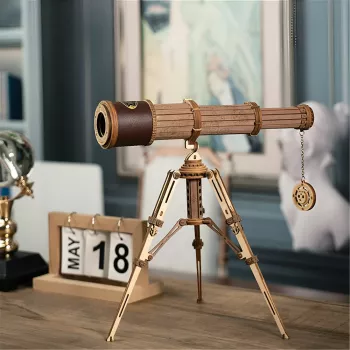
DIY 1:1 Wooden Monocular Telescope Kit: Build, Focus, and Explore
A wooden monocular telescope kit blends the satisfaction of making something with the “aha” moment of seeing optics work in real life. Instead of simply unboxing a gadget, you assemble a compact instrument, learn how alignment affects clarity, and practice focusing until distant details snap into view. Below is a practical guide to what these kits are, how assembly typically flows, how to get a crisp image, and how to use and store your finished monocular for everyday exploring. For more guidance, see Hazard detection with a monocular bioptic telescope – PubMed.
What a wooden monocular kit is (and what it isn’t)
A monocular is a single-eyepiece telescope designed to magnify distant subjects—think birds on a branch, a landmark across town, or the moon on a clear night. DIY wooden kits add the extra layer of craftsmanship: parts must be aligned, lenses must be handled carefully, and focusing becomes a hands-on lesson rather than a hidden mechanism. For further reading, see Build a Telescope | STEM Activity.
That said, a wooden monocular kit is meant to be compact and handheld. Expect a fun, functional viewing experience, but not tripod-level stability or high-power astronomy performance. They tend to shine for daylight viewing, casual sky looks, and classroom-style demonstrations of basic optics. For background on how telescopes work, Encyclopaedia Britannica’s overview is a solid reference: https://www.britannica.com/technology/telescope.
What comes in the kit and what to prepare
Most DIY wooden monocular telescope kits include pre-cut wooden body pieces, optical lens components, fasteners, and a simple instruction sheet to guide the build. While the kit provides the essentials, a few small extras can make assembly cleaner and the finished monocular more comfortable to hold and use.
Plan to work on a clean table with good lighting. Keep lens surfaces covered until you need them, and avoid setting optics directly on the tabletop where dust can cling or scratch. If a finish is optional, wait until the structure is stable and you’re happy with alignment before sealing or waxing the wood.
Assembly-ready checklist
| Item | Why it helps | Notes |
|---|---|---|
| Microfiber cloth | Prevents scratches and removes smudges | Avoid paper towels on lenses |
| Fine sandpaper (400–800 grit) | Smooths wood edges for comfort | Sand lightly before finishing |
| Craft glue (if needed) | Secures wood joins | Use sparingly near optics |
| Small screwdriver | Tightens hardware cleanly | Don’t overtighten wood screws |
| Clear coat or wax (optional) | Improves durability and feel | Let fully cure before use |
Build overview: a clean, careful assembly flow
A smooth build is less about speed and more about sequencing. Start by dry-fitting wooden pieces to confirm how the tube or body aligns before you commit to screws or glue. This quick “preview” step prevents the most common frustration: assembling a section only to realize it’s rotated or offset.
When you reach the optical components, handle lenses by the edges and avoid breathing directly onto them (condensation attracts dust). Keep adhesives away from optics—glue vapors and accidental smears can haze lens surfaces and reduce contrast. As you seat the objective and eyepiece ends, check that each sits square to the tube so the optical path stays straight.
Getting a sharp image: focusing and viewing tips
If you want a deeper, beginner-friendly explanation of optics concepts behind focusing and image formation, Optica’s introduction is a helpful starting point: https://www.optica.org/en-us/what-is-optics/.
Ways to use it: learning, play, and practical observing
After dark, the moon is a great next step—its bright surface makes focusing easier than dim stars. Try observing along the terminator (the line between light and shadow) where crater edges and shadows show the most texture. For safety, never aim any optical device at the sun without certified solar filtration. NASA’s guidance is clear and worth bookmarking: https://science.nasa.gov/sun/sun-safety/.
Care, storage, and longevity
Product spotlight: DIY 1:1 Wooden Monocular Telescope Kit
If you’re looking for a build that feels both practical and display-worthy, the DIY 1:1 Wooden Monocular Telescope Kit is a strong pick. It’s designed for hands-on crafting and learning, with a classic wooden look that fits equally well in a classroom demo or on a bookshelf.
It also makes a thoughtful gift because the finished monocular feels “earned”—the builder gets both the experience and a usable tool. Current price is listed at $23.51 (may vary) and it’s in stock. For gift pairing, a small keepsake can round out the presentation, such as the Elegant Double-Layer Stainless Steel Necklace or the Fierce Moissanite Tiger Head Ring for Men.
Quick product details
| Detail | Value |
|---|---|
| Product | DIY 1:1 Wooden Monocular Telescope Kit |
| Price | 23.51 USD |
| Availability | In stock |
| Product page | https://smileybaby.shop/diy-11-wooden-monocular-telescope-kit/ |
FAQ
Is a DIY wooden monocular telescope kit suitable for kids?
Yes, with age-appropriate expectations and supervision. Younger kids may need help with small parts and careful lens handling, while older kids and teens often enjoy it as a guided STEM-style project that teaches patience and basic optics.
Why is the image blurry even after adjusting focus?
Common causes include a lens inserted backward, parts not seated fully, slight misalignment of the optical path, or fingerprints/dust on the lenses. Recheck lens orientation, confirm everything is centered and square, then clean gently with a blower and microfiber cloth before testing focus again on a high-contrast target.
Can it be used to look at the sun?
No—never look at the sun through a monocular or any telescope without certified solar filters designed for direct solar viewing. For safe observing, stick to daylight targets (landscape and wildlife) and nighttime viewing of the moon.











Leave a comment